
TL;DR

Get backup power and energy gear delivered free with Prime
- Fast, free delivery on millions of items
- Prime Video, Amazon Music and more included
- Member-only deals all year
A closet can serve as a budget-friendly vocal booth if you focus on proper placement, sealing gaps, and adding absorption, rather than relying solely on foam. Moving the rig away and ensuring good airflow are the smartest moves.
Imagine turning a tiny closet into a quiet, effective recording space. It’s easier than you think—and way more practical than building a costly studio room.
Most creators overlook the simple power of placement and sealing, thinking foam alone will block noise or improve sound. But the secret is to put distance between your mic and the noise source, and to treat the main reflection points. This guide on acoustic treatment shows how to do it without breaking the bank, using real-world tips that work.
Acoustic dampening
& the rig in the closet.
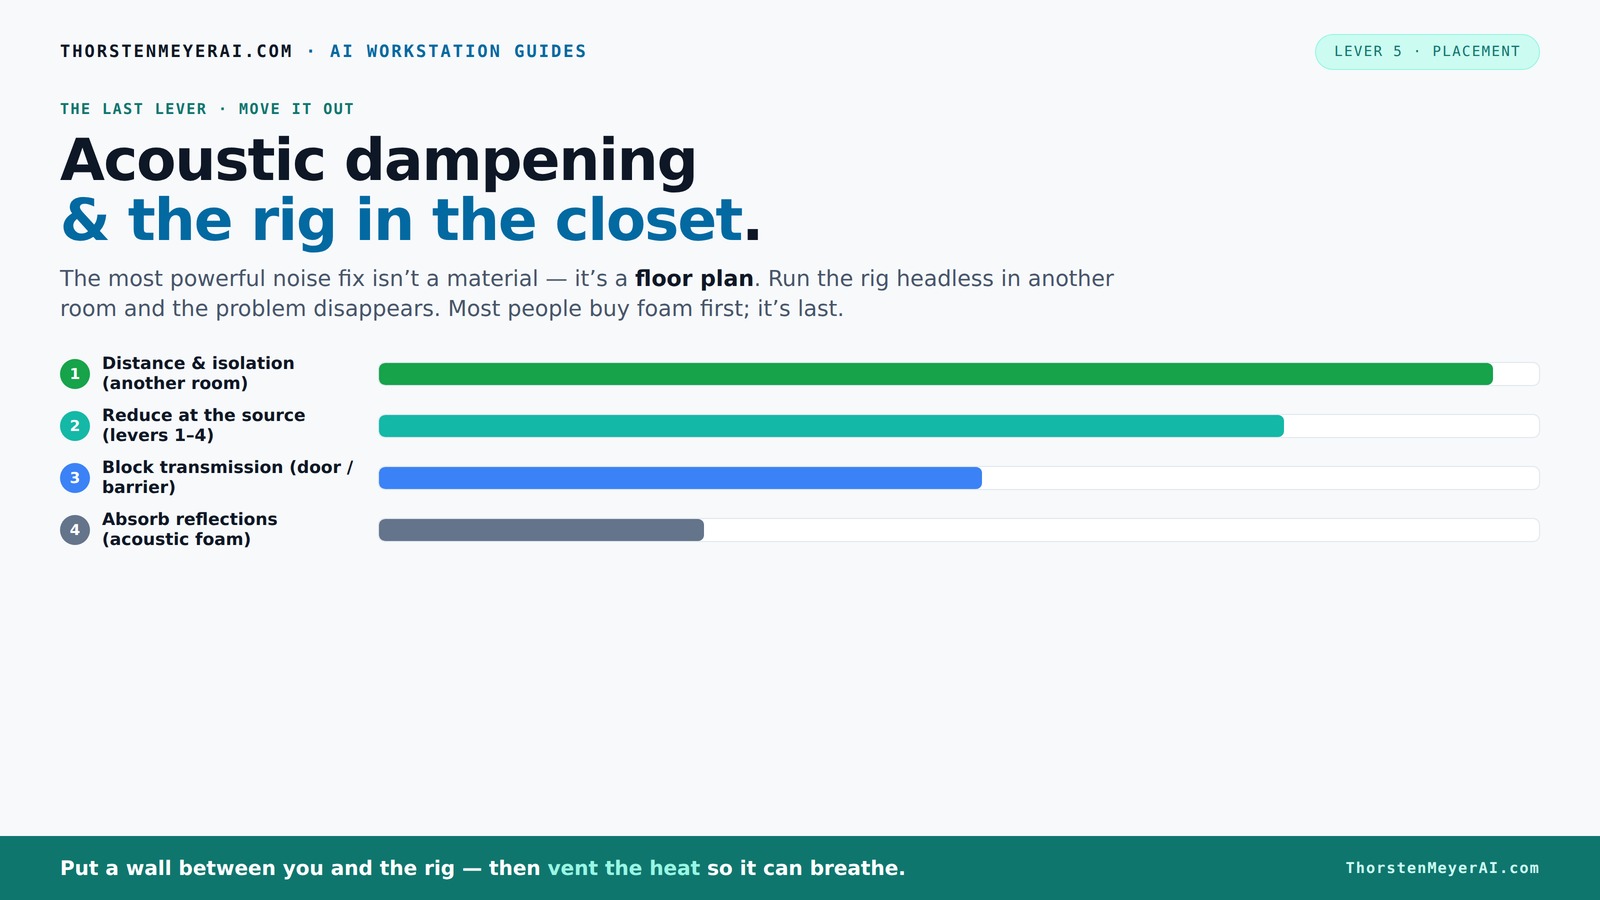
The most powerful noise fix isn’t a material — it’s a floor plan. A rig you can’t hear because it’s in another room beats any amount of foam. Tap the approaches in Part 1 to see what actually works.
(another room)
(levers 1–4)
(door / barrier)
(acoustic foam)
Contain the noise, not the heat
Key Takeaways
- Move your rig to another room or closet to eliminate most noise before adding treatment.
- Seal gaps around doors and reflective surfaces first—these are the biggest leak points.
- Use layered absorption: blankets for low-frequency damping and foam panels for reflections.
- Ensure proper ventilation—heat buildup can ruin the entire setup.
- Position your mic carefully, focusing on the main reflection point for clearer vocals.
budget vocal booth acoustic treatment
As an affiliate, we earn on qualifying purchases.
As an affiliate, we earn on qualifying purchases.
Why Moving Your Rig Is the Smartest First Step
Distance is the most effective way to cut noise. If you can put your AI workstation, gaming rig, or audio gear in another room—say, a closet, basement, or spare corner—you eliminate most of the sound reaching your workspace.
Think about it: a loud GPU or fan noise in a different room is invisible to your ears. You just connect via remote desktop or SSH, and the noise stays far away. This simple change often beats all the foam and barriers combined.
For example, many content creators keep their computers in a closet or basement, then work from a quiet desk. This frees them from loud fan hums and high-pitched whines, making their voice recordings crystal clear.
soundproofing foam panels for recording
As an affiliate, we earn on qualifying purchases.
As an affiliate, we earn on qualifying purchases.
The 'Rig in the Closet' Setup — How to Ventilate Without Ruining Silence
Placing a hot, high-performance machine in a closet sounds perfect—until heat builds up. Without proper ventilation, your rig will overheat, throttle, and fans will roar louder than ever. Learn more about managing heat and noise in small spaces.
To keep your rig cool while keeping noise down, add active ventilation. This can be a quiet exhaust fan pulling hot air out and drawing in cooler air, or a ducted system that vents heat outside.
Some creators use purpose-built soundproof cabinets with temperature-controlled fans, which balance heat dissipation with noise reduction. Check out this guide for more on managing heat and noise in small spaces.
As an affiliate, we earn on qualifying purchases.
Acoustic Treatment: Absorption vs. Isolation — What Matters Most
Acoustic dampening is about reducing reflections inside your closet, which can cause echo and muddiness, rather than preventing sound from escaping. Foam panels, blankets, and rugs help soften echoes and improve clarity within the space, but they don't block sound leaks effectively. Think of them as tools for improving internal sound quality rather than soundproofing. For more on sealing gaps and improving isolation, see this comprehensive guide.
Airborne noise—such as fans, hums, or external sounds—can be absorbed with foam and blankets, but these materials alone won’t stop sound from leaking outside. To truly contain sound, you need a solid barrier—like sealing the door with weatherstripping, adding mass-loaded vinyl, or constructing a more airtight enclosure.
Structure-borne noise, which travels through vibrations in the desk or walls, requires different strategies like anti-vibration mounts or decoupling the equipment from surfaces. These methods prevent vibrations from turning into sound that escapes the space, offering a more comprehensive approach to noise control.
Understanding the difference between absorption (internal reflections) and isolation (preventing sound escape) is crucial. Combining both strategies—internal dampening and external sealing—yields the best results for a quiet, professional-sounding setup.
As an affiliate, we earn on qualifying purchases.
Best Placement of the Microphone in a Closet Booth
Your mic position can make or break your sound in a tiny space. Start by placing the mic about 6-12 inches from your mouth, aiming slightly downward or directly at your lips. Discover tips for optimal microphone placement.
Identify the main reflection point—often the wall behind you—and angle the mic or treat that spot with absorption. Use a reflection filter or a small foam panel behind the mic to reduce room sound and echo. Proper placement minimizes the pickup of reflected sound waves, which can cause echo and muddiness, especially in small, reflective spaces.
For example, a streamer in a closet used a boom arm and positioned the mic off-center, with a foam shield angled to catch reflections. The result? Clear vocals with minimal echo, highlighting how strategic placement and treatment can dramatically improve sound quality in confined spaces.
How to Seal Gaps, Doors, and Reflective Surfaces First
Gaps around the door, cracks, and unsealed corners are the main escape routes for sound. Sealing these is the quickest, most cost-effective way to improve noise isolation. Why? Because sound leaks through small openings, and sealing them reduces the overall noise escape significantly, often more than internal treatment alone. For detailed sealing techniques, see this step-by-step guide.
Use weatherstripping or acoustic sealant around the door frame to block sound paths. Hanging a thick blanket or soundproof curtain over the door adds mass, dampening sound transmission. Inside the closet, add absorbent material to reflective surfaces—such as the ceiling, corners, and hard walls—to reduce echoes and standing waves that can muddy your recordings.
Prioritizing sealing gaps and reflective surfaces creates a more airtight environment, which is critical for effective noise control. For example, sealing a closet door with weatherstripping can cut noise by 10 dB or more, making a noticeable difference in recording clarity and overall sound isolation.
Should You Use Foam, Blankets, or Both? The Pros and Cons
Foam panels are lightweight, easy to mount, and excellent for reducing high-frequency reflections and flutter echoes—these are the reflections that cause a harsh, metallic sound. Blankets, especially thick moving blankets, are versatile, inexpensive, and can absorb mid to low frequencies when hung with a gap, helping to tame deeper resonances and reduce roominess. For more on effective acoustic treatment, visit this resource.
For a small closet, layering is key. Hang blankets on the walls to dampen low-frequency resonances and reduce room size effects. Then, place foam panels at reflection points—like behind the mic and on side walls—to control high-frequency echoes. Thicker blankets or multiple layers improve low-frequency absorption but can reduce clarity if overused, so balance is essential.
For example, a streamer layered blankets over foam panels, creating a makeshift vocal booth that sounds much more controlled and professional, all while keeping costs low. Combining both materials leverages their strengths—blankets for broad absorption and foam for targeted reflection control—resulting in a balanced acoustic environment.
When and Why to Use Bass Traps in a Tiny Closet
Bass traps are often overlooked but can be a game-changer if you notice low-end rumble or uneven frequency response. In small closets, parallel walls create standing waves that boost bass frequencies, causing muddiness and uneven tone. Adding bass traps in the corners or behind your mic helps absorb these low frequencies, smoothing out the response and providing a clearer, more balanced sound.
Deciding if bass traps are necessary depends on your recordings. If you hear a boomy or muddy quality, especially in voice recordings, then traps can be highly beneficial. They are most effective in corners where low-frequency buildup occurs. For instance, a voiceover artist added small bass traps in the closet corner, which significantly reduced muddiness and resulted in crisper, more natural voice recordings.
While not always essential in tiny spaces, bass traps are a worthwhile investment when low-frequency issues compromise your sound quality, especially for professional-sounding recordings or music production.
Frequently Asked Questions
Is acoustic foam enough to soundproof a closet?
No, foam reduces reflections inside the space but doesn’t block outside noise. For true soundproofing, sealing gaps and adding barriers are necessary.Where should I place the microphone in a closet booth?
Start with the mic 6-12 inches from your mouth, aiming at your lips, and position it to minimize main reflections. Treat the reflection point behind and around the mic with foam or blankets.Should I treat the walls, ceiling, or door first?
Prioritize sealing gaps around the door and blocking the main reflection surfaces like the wall behind you and the ceiling. These are your biggest leak points.Do I need bass traps in a small closet?
If you notice low-end boom or uneven response, adding bass traps in the corners can help tame resonance and improve clarity.How can I stop sound from leaking out of the closet?
Seal gaps, add mass with blankets or soundproof curtains, and use acoustic treatment on reflective surfaces. For full isolation, structural upgrades may be needed.Conclusion
The real magic happens when you combine smart placement, sealing leaks, and layering absorption. Your closet can become a surprisingly effective vocal booth—without breaking the bank.
Remember: noise reduction isn’t just about foam. It’s about strategy, sealing, and airflow. Once you get those right, your recordings will sound clearer, tighter, and more professional—even in a tiny space.
Fall Picks
fall essentials
As an affiliate, we earn on qualifying purchases.